How to swap XRP to USDT without KYC
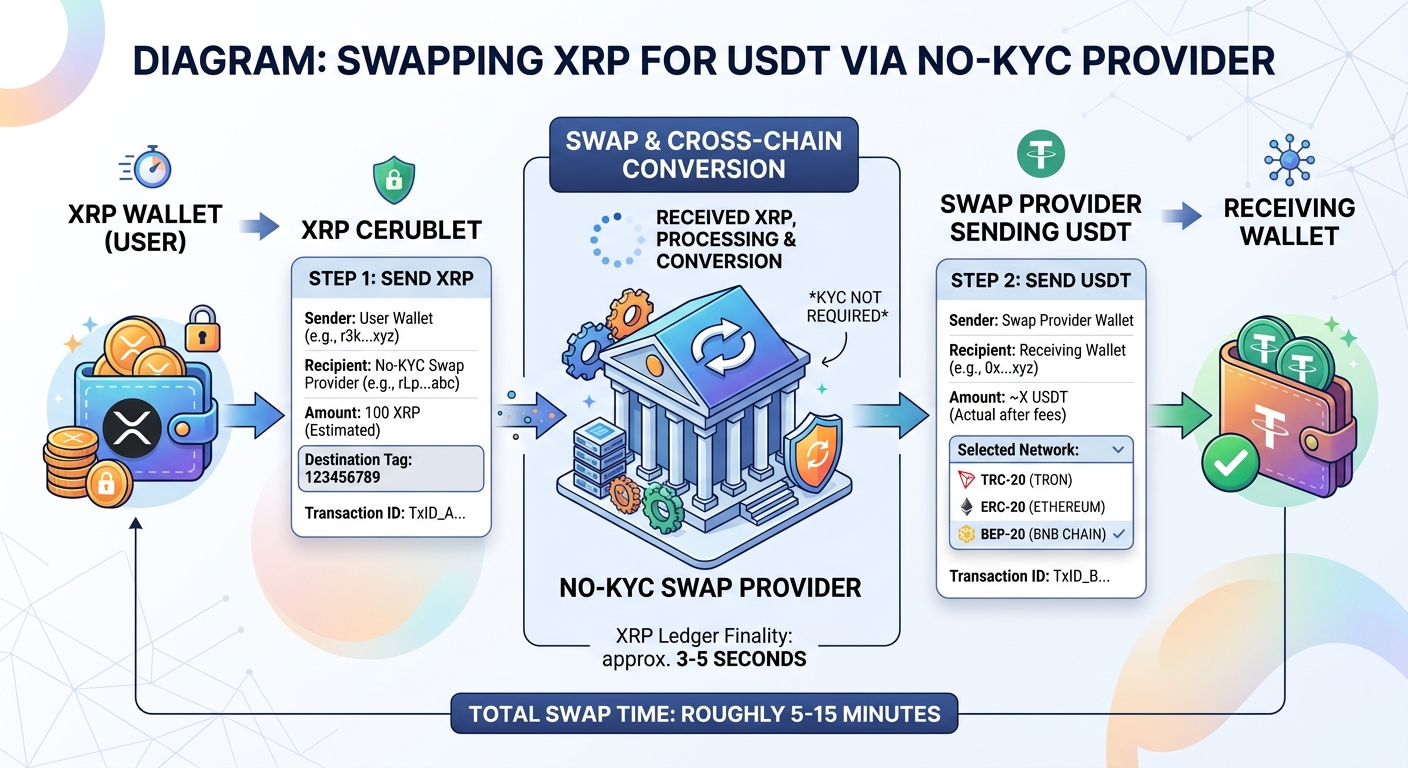
So, suppose you’re swapping 100 XRP. The XRP payment can settle in seconds, while the resulting USDT may take several minutes to arrive.
That gap is where most confusion starts. But a “no KYC” label describes the initial product flow; it doesn’t promise anonymity. A provider may still request identity or source-of-funds information, pause an order, enforce minimums, or ask questions. No KYC is a product feature, not a guarantee of privacy.
So for external-chain USDT, an instant-swap provider is usually the practical route. You’ll choose the output network and compare an offer. Then send XRP with the correct tag and verify the hash. Afterward, we’ll cover fees, the XRPL DEX, limits, and delays.
In this article
- An instant swap is the practical route to external-chain USDT
- XRP settles in seconds; provider delivery takes longer
- Choose the USDT network before copying an address
- Compare the final amount, not the zero-fee label
- Follow the XRP-to-USDT transaction
- The destination tag decides which order gets credited
- The famous 10 drops figure is technically correct and practically misleading
- The XRPL DEX is for issued XRPL assets
- No-KYC swaps still have limits, AML checks, and risk
- Diagnose a delay before sending anything again
- Use this checklist before pressing send
An instant swap is the practical route to external-chain USDT
Swap XRP to USDT right here — live widget below.


Swap XRP → Tether
Live rate · settles in minutes
Use an instant-swap provider when you want USDT on Tron, Ethereum, or BNB Smart Chain. But “instant” describes the product category. Delivery still takes time.
The ordinary path is:
Your XRP wallet sends XRP to the swap provider, which sends USDT to your wallet
Swapzone compares partner offers. But Exolix presents one provider’s route. Both describe no-registration or no-KYC flows, subject to their conditions.
Select XRP as the asset you send and USDT as the asset you receive. Then choose the exact output network. This guide covers USDT on Tron, Ethereum, and BNB Smart Chain; it doesn’t cover every network a provider may list.
For ordinary external-chain USDT, the XRPL DEX is needless complication. The DEX trades issued XRPL assets. The external-chain workflow delivers USDT on Tron, Ethereum, or BNB Smart Chain. Choose the DEX only when you specifically want an XRPL-issued token and understand its issuer, liquidity, and withdrawal path.
XRP settles in seconds; provider delivery takes longer
XRPL ledgers close approximately every 3–5 seconds. The research notes put most accepted transactions at roughly 4–7 seconds, though the published close interval is the more useful baseline.
For the XRP leg, verify both:
- the result is
tesSUCCESS; - the transaction appears in a validated ledger, commonly shown as
validated: true.
As XORA explains, a successful result in a validated XRPL ledger is final. Counting XRP confirmations like Bitcoin is cargo-cult troubleshooting. Once the payment is validated successfully, inspect the next stage instead.
The completed swap has another stage. Provider estimates in the supplied material range from roughly 5–15 minutes to 10–20 minutes. Review and liquidity checks can happen after your XRP has settled. Batching, wallet crediting, and the separate USDT transfer may follow.
If the provider has not produced an XRP transaction hash, the order is generally still in provider-side processing. A validated hash proves only that the XRP leg settled. Confirm USDT delivery on the destination chain.
Choose the USDT network before copying an address
USDT exists on multiple chains. The ticker is familiar, but the networks, addresses, and fees are different. A TRC-20 deposit route is a separate instruction from an ERC-20 or BEP-20 route.
For the running example, you want to swap 100 XRP into USDT held in your own Tron-compatible wallet. Select USDT-TRC-20 before copying the destination address. Sending USDT on Ethereum to a TRC-20 deposit route can leave the deposit uncredited, even when the address appears familiar.
The following figures are provider-listed estimates, not permanent chain fees:
| Network | Provider-listed speed estimate | Indicative provider estimate | Useful when | Main trade-off |
|---|---|---|---|---|
| TRC-20 | About 3–57 seconds | Under $1 | You want commonly supported, lower-cost USDT | Your destination must support Tron |
| ERC-20 | About 12–60 seconds per block | About $1–20+ | Your destination specifically requires Ethereum USDT | Fees can dominate small swaps |
| BEP-20 | Under 1 second | Under $0.10 | Your destination supports BNB Smart Chain | The destination must accept BEP-20 deposits |
These are not guaranteed network fees and may describe the provider’s route or transfer estimate. Actual timing and cost vary with provider, congestion, liquidity, and transaction conditions. The output chain has its own timing and fee profile, while your XRP payment uses XRPL.
USDT and USDC are different tokens. A destination requesting USDT needs USDT on its supported network.
Compare the final amount, not the zero-fee label
An aggregator can save time. Read the order details before choosing the largest displayed number.
A 0% platform fee tells you only that the platform lists no separate platform charge. Compare the final USDT amount with the amount shown after all costs. A spread or embedded route charge can still reduce what reaches your wallet.
The offer screen should also show the rate type, minimum, estimated time, KYC label, and partner rating. A fixed-rate offer locks the quoted output when you create the order, subject to the provider’s rules. A floating-rate offer uses the market rate during processing, so the final amount can change.
| Choice | Useful when | Main trade-off |
|---|---|---|
| Fixed rate | You need a known quoted output | The rate may be less attractive or carry stricter conditions |
| Floating rate | You prefer the live processing rate | The final USDT amount can change |
| Highest displayed output | You’re optimizing the quoted amount | The offer may carry a longer estimate or weaker rating |
| Higher-rated partner | You value operational confidence | The quoted output may be smaller |
I’d choose a slightly worse quote over an offer whose recovery policy you can’t find. That’s especially true when the transaction requires a destination tag or the amount is large enough to hurt.
The notes don’t provide a live quote, so the example deliberately carries 100 XRP without inventing a USDT amount. For a volatile market or a larger amount, pay attention to how long the quote remains valid; for a small swap, compare the final output and minimum first.
Follow the XRP-to-USDT transaction
1. Select the pair and output network
Choose XRP as the send asset and USDT as the receive asset. Enter the amount, then select TRC-20, ERC-20, or BEP-20.
For the example, enter 100 XRP and select USDT on TRC-20. The network must be chosen before you enter the receiving address.
An aggregator will show several partner offers. A direct-provider route sends the order through one service.
2. Recheck the order conditions
Review the output amount, rate type, minimum, estimated time, KYC wording, and partner rating before creating the order.
Treat “no KYC” as a description of the initial order flow. It doesn’t prevent a later compliance review.
3. Enter the USDT destination
Paste the address from the wallet or exchange that will receive your USDT. Confirm that it supports the selected network. Tron handles TRC-20, Ethereum handles ERC-20, and BNB Smart Chain handles BEP-20.
Compare the pasted address with the current order page before confirming. Treat the transfer as irreversible unless the provider explicitly says it can recover that deposit.
4. Copy the XRP address and tag
The order will display an XRP deposit address and, often, a destination tag. Copy both exactly from the current order.
Use an XRPL-compatible self-custody wallet such as Xaman, Ledger, or Trust Wallet with XRPL support. If your wallet exposes a destination-tag field, enter the supplied tag there; never append it to the address. Save the order ID and deposit details before sending.
5. Send XRP once and verify the hash
Send the XRP payment with the supplied tag. In the example, that means sending 100 XRP to the displayed address with its order-specific tag.
Find the transaction hash in your wallet and check it in an XRP Ledger explorer or compatible wallet view. Confirm tesSUCCESS and validated status.
The provider may still need to process the order and send USDT on the selected network. Check the order status and the receiving wallet there. Don’t create a second payment because the first order still says pending.
The destination tag decides which order gets credited
Many exchanges and swap services use one XRP address for many customers. The destination tag identifies the customer or order in the service’s internal accounting.
If the receiving address has RequireDest enabled, a payment without the required tag can fail. If it doesn’t enforce the field, the payment may validate successfully while remaining uncredited because the service can’t identify the order.
If you omitted the tag, contact support. At minimum, provide the transaction hash and amount. Add the sending address and intended tag. Include the order ID and deposit address if available. Don’t send another payment until support tells you how to proceed.
Copy the address and tag immediately before sending. A small test payment can reduce the risk for a new destination, although it won’t eliminate provider-side processing risk.
The famous 10 drops figure is technically correct and practically misleading
The cited XRPL fee guidance gives a standard minimum of 10 drops, or 0.00001 XRP. The fee is destroyed rather than paid to Ripple, validators, or miners.
Ten drops covers the minimum XRPL transaction fee; the exchange rate, spread, output-chain cost, and withdrawal charge determine the rest. Network load and specialized transaction types can require more.
The account reserve is separate. XRPL accounts must maintain a base reserve, and a payment to a new unfunded address may need to provide enough XRP to create that account.
If the provider’s deposit address is already funded, this usually affects the provider’s account rather than your outgoing payment. A brand-new destination may need enough XRP to activate. Check the wallet and provider instructions before assuming.
For a small swap, the 10-drop fee is rarely the main economic issue. If your balance is close to the provider minimum, the spread and minimum may consume the trade’s usefulness. You may be holding XRP dust that the swap service simply can’t process economically.
The XRPL DEX is for issued XRPL assets
The XRPL DEX documentation calls the ledger’s native exchange “possibly the world’s oldest decentralized exchange,” It has operated continuously since the XRP Ledger launched in 2012.
The DEX uses Offer transactions. Offers execute as ledgers close. Auto-bridging may also use XRP between two tokens when that gives a better path.
You make the trading decisions yourself. The DEX has no native market, stop, or leverage orders. It isn’t designed for high-frequency trading. Order within a ledger is deliberately unpredictable.
Anyone can issue an XRPL token using a currency code or ticker. An XRPL token labelled “USDT” may be unrelated to Tether’s USDT on Tron, Ethereum, or BNB Smart Chain. Treat the issuer as the identity of the asset; the ticker alone proves nothing.
The ledger account record doesn’t attach your legal identity to the account itself, but that says little about private off-chain activity or your legal obligations.
Use the DEX when you deliberately want an issued XRPL asset and have checked the issuer, liquidity, and route out of the ledger. For external-chain USDT, use the instant-swap route.
No-KYC swaps still have limits, AML checks, and risk
I can explain the transaction mechanics with confidence; I can’t verify a universal no-KYC limit or predict how a provider will handle your order today. Check the live order screen and terms before sending. My advice is weakest where provider policies change fastest: limits, recovery, and compliance decisions.
There is no reliable consolidated table of no-KYC limits in the supplied material. Some secondary reports quote figures such as 10 BTC in one region and roughly 1,000 USDT in another. Those numbers change and don’t describe the swap providers here, so they’re poor planning inputs.
Minimums create the opposite problem. A provider may reject a small XRP balance or make the swap uneconomic after spreads and network charges. If the balance is close to the minimum, the 10-drop XRPL fee is rarely the main issue; the provider minimum and spread may consume the trade’s usefulness.
A no-registration flow can still trigger AML or identity procedures. The provider may pause an order, request information, or refuse service under its policies.
The notes don’t support a universal legal conclusion about every no-KYC service. They do support a safer conclusion: operators face regulatory scrutiny, and your local reporting and tax obligations don’t disappear. Sanctions obligations remain too because a provider skips registration.
The ledger account record doesn’t attach your legal identity to the account, but blockchain transactions remain part of a public ledger system. A no-KYC label is therefore a poor substitute for a privacy analysis.
If the possibility of a review or delay is unacceptable, this route is the wrong tool. Read the provider’s current terms, supported jurisdictions, minimums, and recovery policy before you send.
Diagnose a delay before sending anything again
Use the transaction hash to locate the problem:
- No XRP hash: the payment may still be in provider-side processing.
- Hash without validated success: the transaction is tentative or failed.
- Validated
tesSUCCESS: the XRP leg settled; inspect the order status and wait for provider processing or USDT delivery. - Validated payment with no credit: check the destination tag and contact support using the saved order details and hash.
- USDT missing: confirm that the receiving wallet supports the selected network and token.
For the 100 XRP example, a validated XRP hash proves that 100 XRP reached the provider’s XRPL address. Check the receiving wallet on Tron to determine whether the provider has sent USDT-TRC-20.
Never resend blindly. The first payment may already be successful.
Use this checklist before pressing send
- Pair: XRP in, USDT out.
- Network: TRC-20, ERC-20, or BEP-20 matches the receiving wallet.
- Address: The destination address belongs to the current order and selected network.
- Tag: The supplied XRP destination tag is entered in the correct field.
- Minimum: Your amount clears the provider’s minimum after all quoted costs.
- Rate: You understand whether the offer is fixed or floating.
- Hash: You’ll save the transaction hash and verify
tesSUCCESSplus validation. - Delay tolerance: You can wait through the provider’s stated processing window.
- AML possibility: You accept that a review or information request may still occur.
If any answer is unclear, stop. What route fits your goal? For external-chain USDT, an instant swap is usually the cleanest route. The XRPL DEX is for the narrower case where you specifically want an issued XRPL asset.